• Home
  • Press
  • Meet Sweet Life
  • Work with me
  • Cocktail Catering
  • Contact
    • Facebook
    • Instagram
    • Pinterest
    • Twitter
    • YouTube

Sweet Life

Cooking, Eating, Living My Sweet Life in Texas

  • Home
  • New Cookbook!
  • Videos
  • Recipes
    • Appetizers
    • Breakfast
    • Lunch
    • Entrees
    • Salsas & Dips
    • Soups & Stews
    • Sides
    • Sweet Treats
    • Drinks
    • Holidays
  • Cocktails
    • Margaritas
    • Tequila
    • Pisco
    • Rum
    • Vodka
    • Bourbon
    • Brandy
    • Whiskey
    • Champagne
    • Gin
    • Wine
    • Beer
    • Rum
    • Campari
    • Infusions
    • Holiday Cocktails
  • Entertaining
  • DIY Projects
  • The Tex-Mex Queen
  • Shop
  • En Español

DIY Projects » How to make Dyed Corn Husk Flower Vases

Get new recipes delivered to your inbox each week.

How to make Dyed Corn Husk Flower Vases

118shares
  • Facebook 16
  • Twitter

Photo by Jason David Page

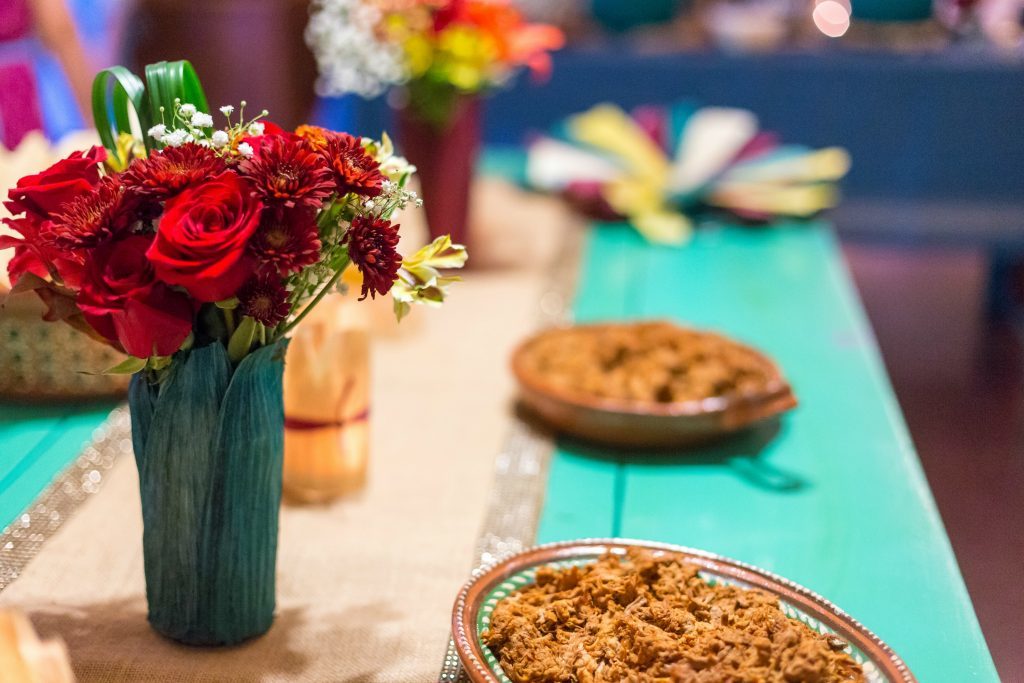
Hola! I’m back with a fun and festive way to showcase all those beautiful corn husks you purchase to make tamales. For our annual tamalada I wanted to create something to display my Lone Star Living Bouquets. Lone Star Living Bouquet is the first floral bouquet dedicated to celebrating your Texas life sold exclusively at HEB. I am obsessed with their flowers and showcase them in my kitchen weekly.

My little sister took the lead in this DIY and we both loved the final result so much that I featured them in my tamalada post. The best part is that the vases are so simple to create but they look really, really impressive. I love how it showcases the corn husks which are a vital part of any tamalada.

Let’s get started.

These are the supplies you’ll need to make this gorgeous DIY Dyed Corn Husk Flower Vases:

1 package corn husks, find these in the Latin section of your grocery store.

Disposable Aluminum Foil Pans

Liquid Dye – I used wine and turquoise.

Canning jars – I used 24 ounce jars.

Glue gun, glue sticks

Gloves

Step 1: Mix liquid dye as instructed on package in disposable pans, being careful with hot water. I place my pans on baking sheets for a studier surface.

Step 2: Wearing gloves or using tongs, evenly divide corn husk between two disposable pans depending on how many colors you are dying. Push down husks until they are fully submerged.

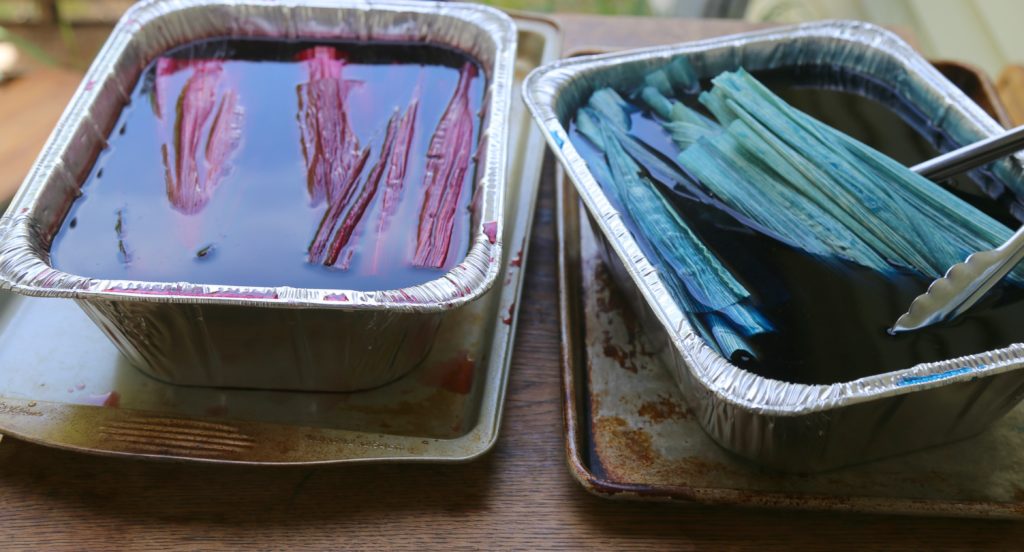
Step 3: Allow corn husks to steep in dye for at least 4 hours, turning with tongs occasionally so the husks dye evenly.

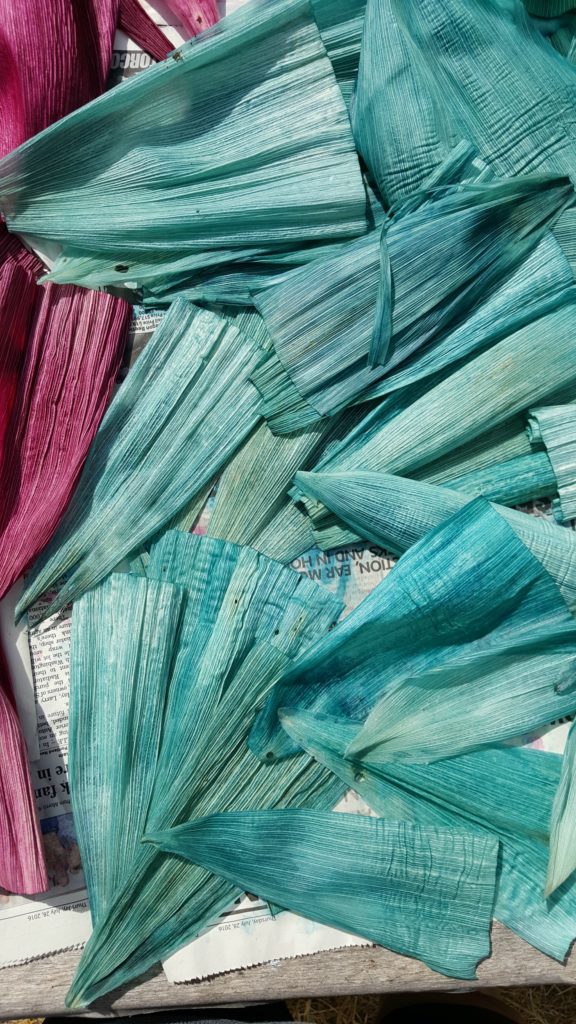
Step 4: When ready using, gloves remove dyed corn husks from pan, rinse and place on newspapers to dry in direct sunlight.

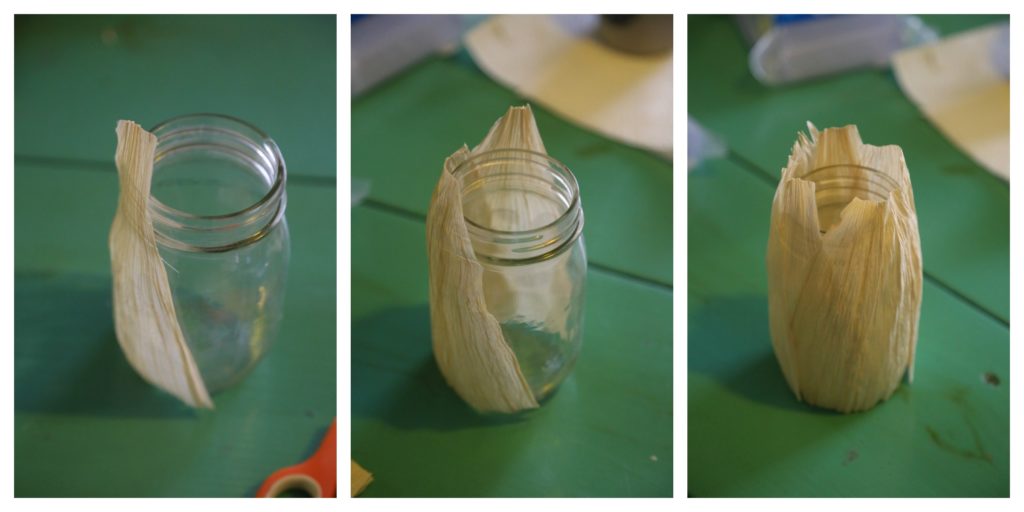
Step 5: Once corn husks have dried completely use glue gun to attach to canning jar as seen in image above. I made a few vases using corn husks that were not dyed to show in the step-by-step above, which I later used as candle holders.

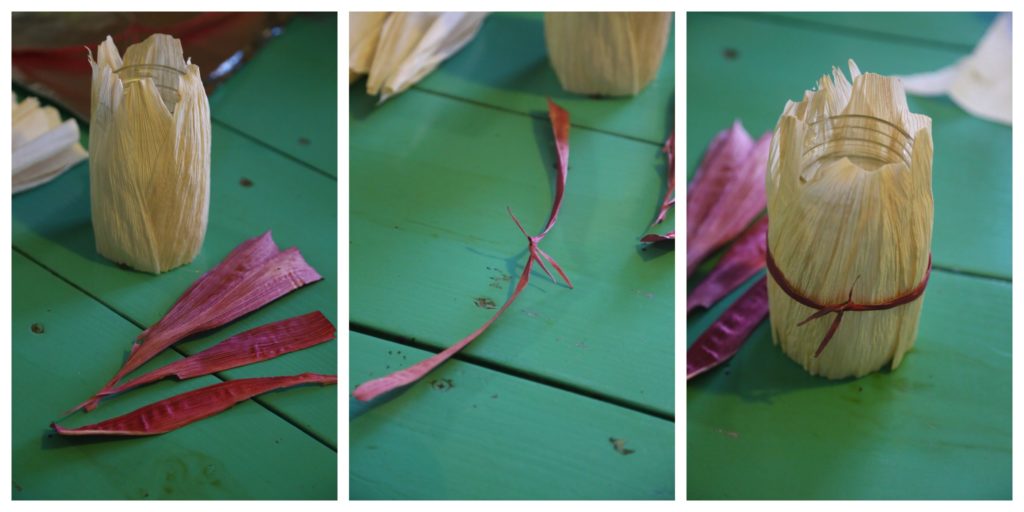
Step 6: Using additional dyed corn husks, trim to make a ribbon for each vase, as pictured above. This step is optional.

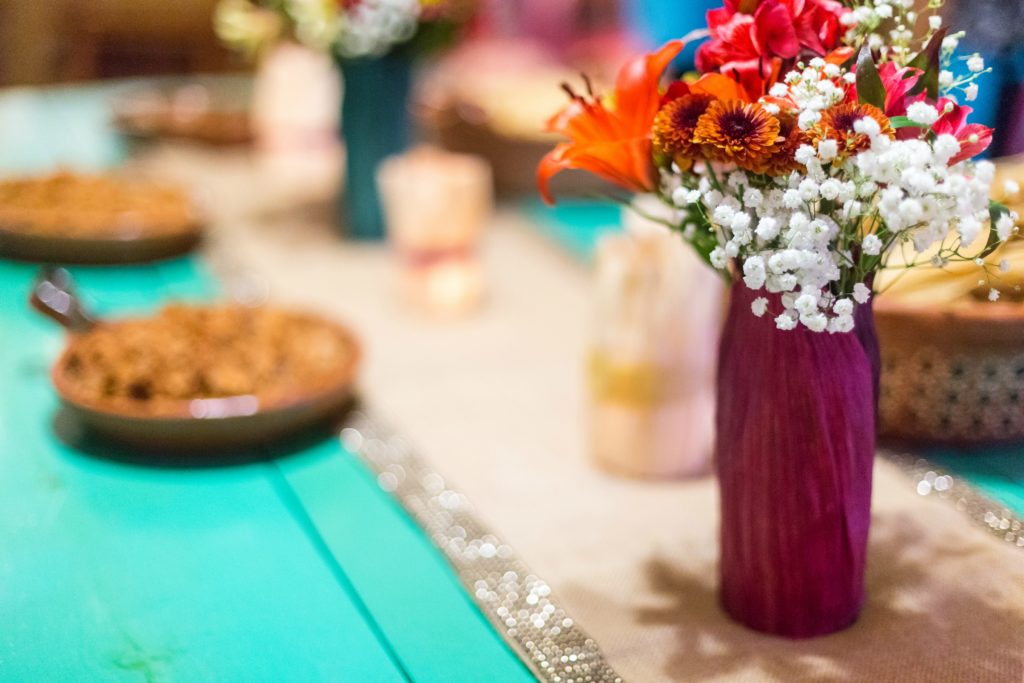
These festive vases are not only simple to make, they make a beautiful addition to any party or event you have.

I absolutely love them!

In fact, I’ve used it several times when entertaining already.

Happy crafting!


DIY Projects// Entertaining// Uncategorized1 Comment


More from Sweet Life:

  • Contributor to MamiverseContributor to Mamiverse
  • DIY ~ Dia de Los Muertos MugsDIY ~ Dia de Los Muertos Mugs
  • Pickled Jalapeño Shredded Beef FlautasPickled Jalapeño Shredded Beef Flautas
  • 14 Days of Love 14 Days of Love
  • Chile Ancho Grilled Lamb Chops with Kendall-Jackson WineChile Ancho Grilled Lamb Chops with Kendall-Jackson Wine


From the Shop

  • Soy Tejana T-Shirt
  • I Like Big Conchas Coffee Mug
  • Holy Frijoles T-Shirt
  • Feelin' Floja Coffee Mug
  • Queso by Day, Tequila by Night Tank Top
  • Fueled by Queso Black / Yellow Graphic Tank Top
  • Pedro Infante #MCM T-Shirt
  • ¡Dale Gas! Coffee Mug
  • Viva Tequila T-Shirt
  • Queso by Day, Tequila by Nighthttps://cdn.shopify.com/s/files/1/1722/4479/products/american_apparel__heather_grey_wrinkle_front_mockup__1_250x.png?v=1484715173
  • No Manches Tank Top
  • If You Spend the Night... T-Shirt


Visit the Shop »


« How to make Champurrado
Fritos Candy »

Comments

  1. Neha Sharma says

    April 4, 2017 at 1:10 am

    Thanks Vianney For this Great tips ! These pictures are beautiful and they do an amazing job of capturing the way they are arranged! Thanks so much for sharing your beautiful work of art!

    Reply

Leave a Reply Cancel reply

Your email address will not be published. Required fields are marked *

Recipe Rating


CommentLuv badgeShow more posts

This site uses Akismet to reduce spam. Learn how your comment data is processed.

Welcome to Sweet Life.

I'm Vianney, an Award-Winning Food Blogger, Recipe Developer and the Author of The Tex-Mex Slow Cooker and Latin Twist. Here in South Texas, we love to entertain and spend time in the company of good people. Sweet Life is a celebration of that connection and the vibrant, unique culture of South Texas.

Featured Cocktails

The Careless Whisper Cocktail {Inspired by George Michael}

June 25, 2019 | Leave a Comment

Sparkling Strawberry Rosé Sangria

May 24, 2019 | 1 Comment

How to Make Hibiscus Salt for Cocktails

May 8, 2019 | Leave a Comment

Cocktail Catering

cocktail catering services, texas, south texas, aransas pass, port aransas, corpus christi texas, south padre island, harlingen, brownsville, mcallen, edinburg, san antonio, houston

Sweet Life on Google +

Follow me on Pinterest

Copyright © 2021 · Sweet Life · Privacy Policy

Copyright © 2021 · Sweet Life on Genesis Framework · WordPress · Log in

118shares
  • 16